 We need your help to keep this website free. You can
Running an e-commerce store taught me one thing very quickly: product images can make or break a sale. No matter how good the product is, low-quality visuals can reduce trust and hurt conversions.
Images that appeared flat, somewhat blurry, and inconsistent across listings, especially after resizing or compression for various platforms, drove me nuts. This was when I began to seek a practical method for image enhancement, without spending hours on manual improvement.
In this article, I discuss why I chose to work with an image enhancer, the issues that haunted me before, and how using one resulted in clear and more professional product images that actually convert. Spoiler: the turning point came when I stopped editing photos by hand and started running them through an AI image enhancer that could fix resolution, clarity, and consistency in a single click.
The Problems I Faced
I built sound, logical assumptions about decently sized imagery, and on launching my listings, problems became evident. We had a few images that looked fine on my device, but after upload, they were blurry or pixelated, which instantly lowered perceived product quality.
Another problem was inconsistency. Having different colour tones, lighting, and backgrounds made my store look shabby and untrustworthy. Visuals don’t have a mere significance in e-commerce, but they are the core of your brand.
Contrary to expectation, things got worse with resizing and compression applied. Each re-sizing sacrificed image quality, frequently losing crucial details and making products more difficult to assess. This is an easy way to increase returns but also lower conversions.
I realized my thumbnails weren't popping either. So, while your pricing is competitive, due to weak visuals, you were getting fewer clicks. And having to manually edit every image quickly became labor-intensive and unhealthy.
It was then that I knew I needed something faster and more efficient, and I began investigating AI image improvement.
What I Tried Before?
Before switching to an image enhancer, I experimented with a few common methods to fix my product photos. I tried basic editing tools to adjust sharpness, contrast, and brightness, but the results were inconsistent. Sometimes the images looked overedited, and other times they still lacked clarity.
I had also resized and compressed images, if they needed to be loaded fast, using freely available online tools. So, less image data makes things faster, and although this does indeed help with page speed, the quality of images generally decreases even more. In some instances, the details of products were softened, which is not suitable for e-commerce listings.
One alternative was that I could outsource editing, but this quickly proved to be expensive and time-consuming to edit around multiple products. Without a reproducible baseline, none of these approaches allowed me to improve image quality reliably and at scale. That was when I understood that I wanted a solution that was much smarter and more time-efficient.
The single feature I kept wishing for was a one-click way to sharpen image files in bulk — something that could recover the soft edges lost during compression without forcing me to push every slider by hand. Manual sharpening filters in basic editors either did too little or pushed the image into that over-processed, halo-edged look that screams "amateur listing." I needed AI-level precision, not blunt filters.
Why I Went and Used an Image Enhancer
By then, I needed something fast but also high-quality image enhancement. It would not be realistic to do manual edits on every image, and I wanted to find a solution that could automatically give me the same experience in all my product listings.
This is when I decided to use an AI image enhancer. What made this even better was the fact that you could automatically improve your image quality without tedious tweaking of each setting during my workflow. I needed something that could increase resolution whilst sharpening details and keeping everything in natural color, with no lighting changes.
It made sense to use a photo enhancer because it solved all the problems that I was having: blurry images, lack of detail, and no more wasting time.
Why Did I Choose Artguru Image Enhancer?
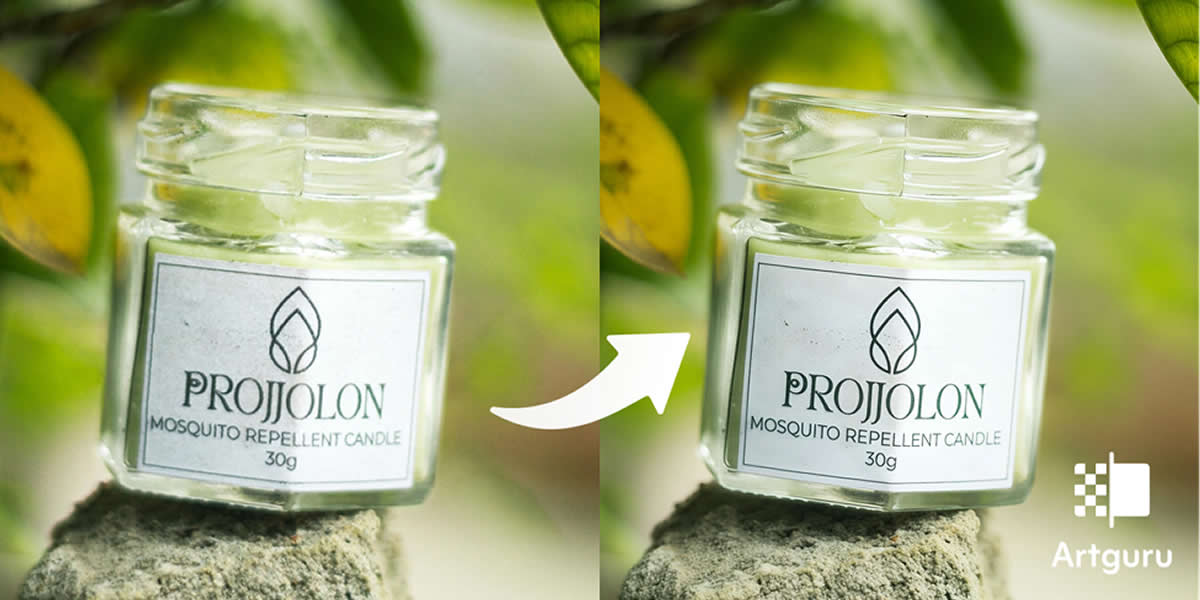
After trying different options, I needed a solution that was simple, reliable, and built for real-world use. That’s where Artguru Image Enhancer stood out. Its interface is clean and intuitive, so I didn’t waste any time learning complicated tools. The user interface is really simple; it uses AI to enhance images in just one click.

Quality was what really sold me. It is able to boost image quality up to HD and even 4K while preserving the original size and colors/lights in an undistorted manner. My product photos began to appear more crisp and precise while still retaining a natural look, which an e-commerce company setter could really ask for.
Another reason was flexibility. It also supports PNG, JPG & WebP and does not touch transparent PNGs, essential for product listings. The batch processing feature allowed me to improve image quality for multiple images at once, saving a lot of time. Moreover, it was available without registration, on the mobile browser, and I did not have any advertisements. It was just an asset that seemed to have been made for someone like me.
How Did I Use an Image Enhancer?
The Artguru photo enhancer worked quite easily and didn’t halt my workflow. I uploaded the images of my product directly on the platform, from which I had not even registered. It allows bulk uploads, so I always work with many images at once.
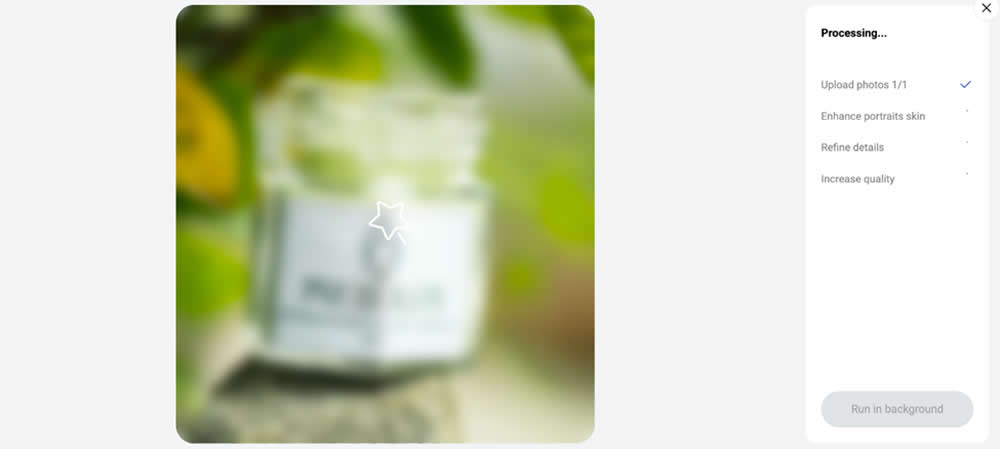
The AI photo enhancer automatically started processing after it was uploaded. It showed a brief queue, and after a few seconds, there were several improvements processed in the background. It was a way to reduce noise, refine product details, boost clarity, and maximize quality. I never had to add anything manually. It actually felt just as effortless as saving high-quality Instagram photos for my mood boards without dealing with complicated workarounds.
I checked the difference using the preview comparison after getting this process done. That helped me understand exactly how the image enhancement impacts sharpness and detail.
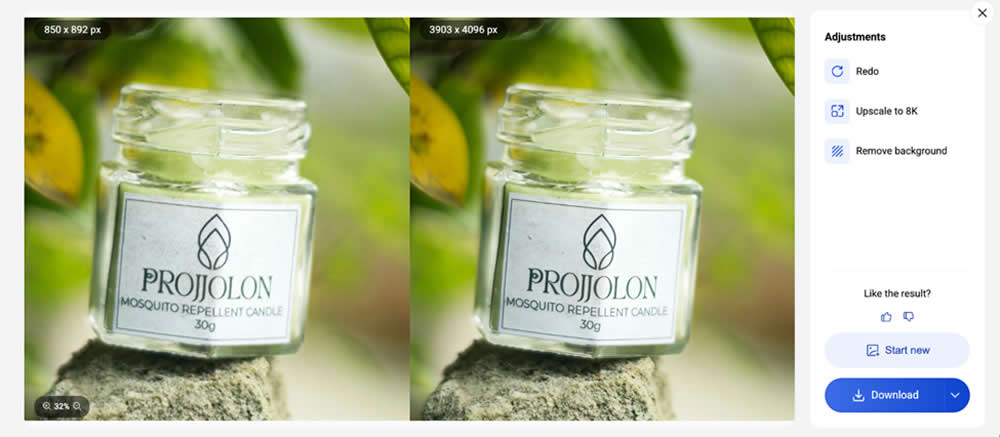
I then downloaded the images in my desired format when satisfied. It kept the file names the same, and it was easy to manage my listings.
For my store, I mainly used 2x or 4x enhancement, depending on the quality of the product image. The outcome was always professional and crisp visuals ready to be uploaded on every platform.
The Results I Got
After switching to an AI image enhancer, the difference was noticeable not just visually, but in performance as well. I now had cleaner edges and more defined details in my product images, especially on items with texture. It gave my listings a more premium feeling without altering the actual product.
I liked the fact that the tool kept the original style. The enhancement of the image did not change the colors or light, and thus, my products looked real. This alleviated confusion with the customer and kept expectations in check with what was actually delivered as part of the product.
The flexibility was also quite helpful. It allowed me to see previews of results before downloading, keeping my advantage with the final output. Having the files keep their old names and formats made handling massive amounts of product images far easier to manage, much like organizing files when you download your favorite Pinterest videos for creative reference.
Gradually, I started getting more interactions on my listings. The images appeared cleaner, more uniform, and more in line with what customers expect from a professional e-commerce store.
Conclusion
Using an image enhancer was not just about improving visuals; it was about improving how my products were presented and perceived. As an e-commerce seller, my own experience perfectly aligns with what academic research on digital product photography consistently confirms: image quality directly relates to how trustworthy your brand is and how effectively you draw other people in.
Artguru Image Enhancer is the only solution that fits into my process seamlessly. It made the whole thing a cake walk when it comes to improving the quality of images without losing their balance or making them look unprofessional. Rather than worrying about image editing for hours, I now spend more time on scaling my business, knowing images are taken care of by an AI photo enhancer. This even frees up my schedule to focus on broader marketing strategies, like figuring out how YouTube creators can grow their channels to drive more traffic to the store.


")


